Campaigns allow you to schedule and send messages to a specific customer segment or your entire customer base. Campaigns differ from automations in that they contain one message and you control when they send.
Why Clone a Campaign
We understand that creating a campaign from scratch can be time-consuming, which is why we've made it even easier to create campaigns with our clone campaigns feature.
- Quickly recreate a successfully sent campaign such as a holiday promotion, daily deal, or educational campaign.
- Create a copy of a scheduled or draft campaign and change the targeted customer segment.
- Build a library of campaign templates (ex: holiday campaign, product drop, daily deal). Clone the template and enter specific details such as product links or discount codes.
- Run A/B tests on variations of campaigns. Try different messages, promotions, or visuals and see which campaigns perform better.
Clone a Campaign
- Select Messaging in the side menu of your Postscript dashboard, then select Campaigns.
- Locate the campaign you wish to clone, then select Clone to the far-right of the campaign's row. You can clone both open and sent campaigns.
- Make your necessary changes, then select Save & Continue to Preview in the bottom-right corner of the page.
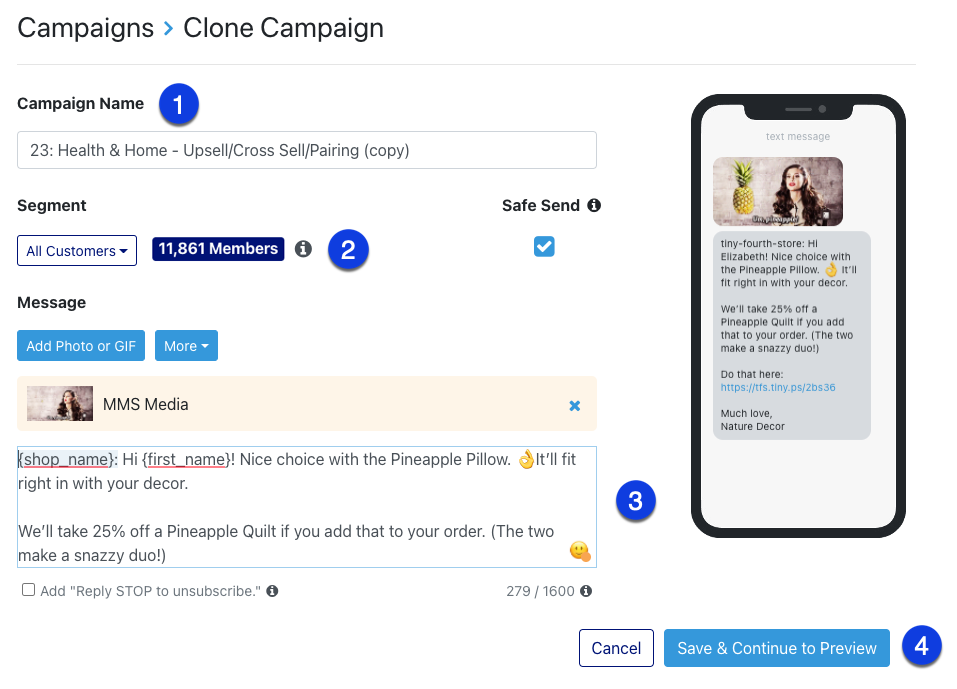
In this example, we have cloned a template campaign for a product upsell. We will want to make sure we change this campaign so we target the customers we want and feature the right product.
- Rename your campaign. Choose a new name that allows you to identify and track this campaign in the future.
- Change the customer segment. Tell Postscript which customers to include in this new campaign by selecting a customer segment from the drop-down list. (Note: You need to create a segment before you can assign it in a campaign.)
- Edit your message. Unless you want to re-send an identical campaign, chances are you need to edit the message. Change up the featured product, discount code, or language using tags such as {first_name} or {shop_link}. Swap out the image or GIF to one that better fits this campaign. (Note: Adding an image or GIF makes the message an MMS message.)
- Save. Select Save & Continue to Preview in the bottom-right corner of the page.
On the campaign details page, you can customize your campaign message and specify which customers Postscript should message.
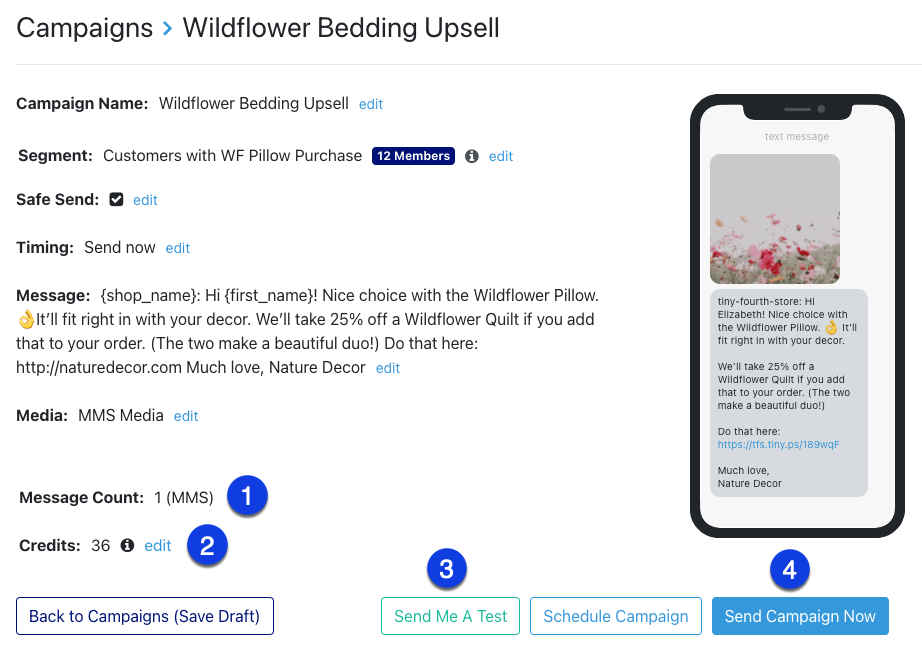
Since we used this template to create a new product upsell, you can see how our updated campaign details reflect a new campaign that follows the template.
There are a few things we want to draw attention to on the preview screen:
- Message Count. See how many messages Postscript will send to each customer included in your campaign.
- Send Me A Test. See how the message looks on your phone and test linked products or pages. (Note: Sending a test message counts as usage just like sending a message to a customer would.)
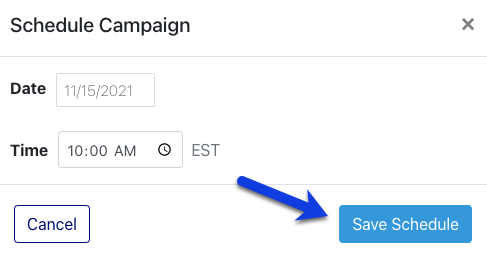
- Schedule Campaign. You can schedule a campaign to go out at a later date and time. Select Schedule Campaign, enter the date and time in the popup, then select Save Schedule.
If you're ready to send the campaign right away, select Send Campaign Now in the lower-right corner of the page.
Schedule a Campaign
Postscript makes it easy to create campaigns and schedule them to send at a later date and time. At the bottom of your campaign preview screen, select Schedule Campaign.
A popup appears and lets you define a future date and time. Note that the time you select is in EDT or EST. Once you define a time, select Save Schedule.
Get Support
Have questions? Please feel free to reach out to our wonderful Support team at support@postscript.io or via live chat. You can also submit a support request here!
Need ongoing channel strategy guidance? Please fill out this form and we'll connect you to one of our certified partners.


